
PART 1: WALLPAPER
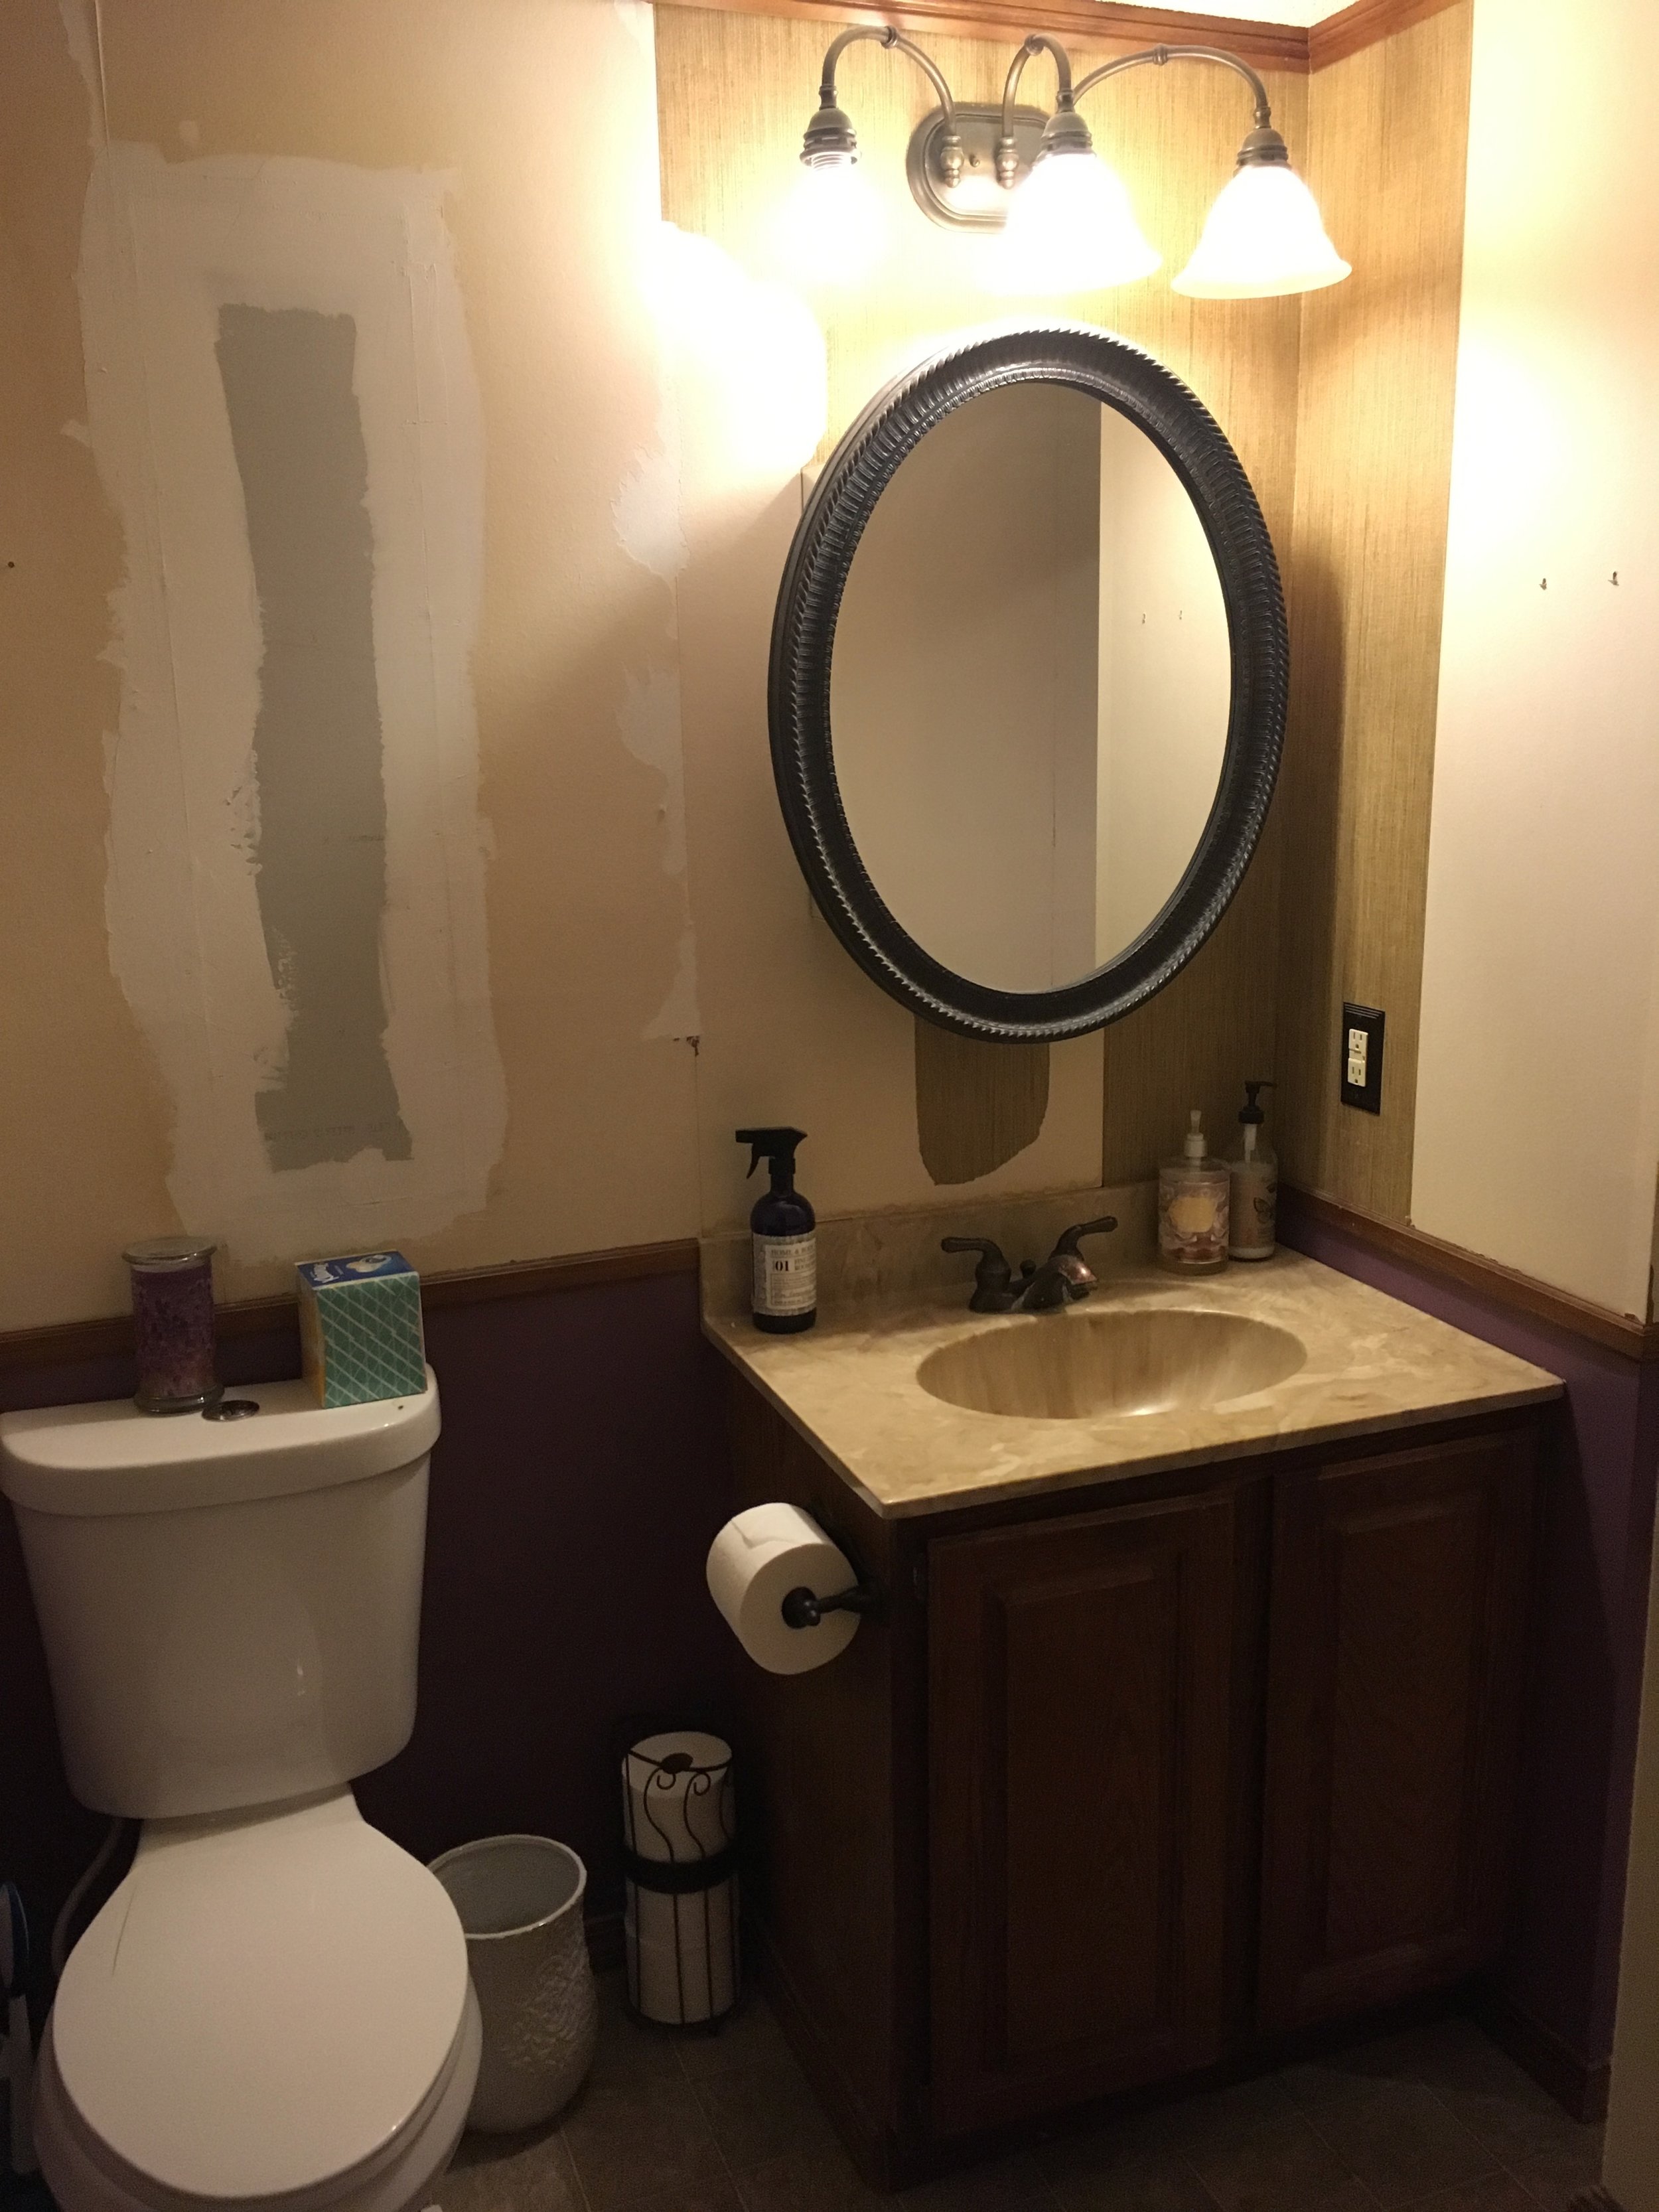
Our bathroom was in desperate need of a renovation. Dark, sad, and completely lacking life. The wallpaper was a textured drab shade of tan above a purple wall. The floors were a peeling vinyl and the lighting got stuck a few decades ago. The vanity was falling apart but had no refurbishing value as it was cheaply made to begin with and the built in sink was hideous. Not that I was hanging out in my bathroom, but it was a depressing place to be when I visited.
I began by tearing down the wallpaper. This wasn't an action stemming from a well contrived plan, but more or less an outbirst. I was sick of those ugly walls and they needed to come down now. I tore panel after panel off the wall, pleased with the simplicity of it all. Why were people always complaining about wallpaper removal? This was easy!
It was easy because I was only removing half of the wallpaper. I had effectively removed the facade of the paper, leaving the beige glued-on backing adhered to the wall. Looked great at first, but then I looked closer. Son of a gun. Ok, ok, no need to panic, I'll just remove the back part of the wallpaper, how hard can that be?? I get it now. All you people griping about wallpaper removal, I HEAR YOU. I started my journey with a clothing steamer. Theoretically, I figured the hot steam would lose the glue and the wallpaper would simply fall from the walls. What a dreamer I was. No such luck. The steam did effectively moisten the wall, so I began scraping with one hand while holding the steamer in the other. With the heat of the steam burning my hand, I frantically scraped the all as paper reluctantly fell in tiny, irritating shreds. Never the quitter, I continued this terrible process for several walls. I refused to admit defeat and purchase wallpaper remover.
(As an aside, our renovation budget had been maxed with other, more highly prioritized, projects. After replacing the roof, every window in the house, gutting the kitchen and master bedroom, designing her nursery, new ceilings, painting.... this bathroom didn't make the list. We replaced the toilet with an inexpensive but functional one and called it a day. My husband agreed to let me attack this room under the condition we could keep the budget less than $300. Well good sir, to you I say CHALLENGE ACCEPTED.)
With my limited budget there was no way I was springing for the wallpaper remover. So I scraped. I hit a point where I had to walk away from the wallpaper part of the project. I was frustrated, aching, and getting nowhere fast, so I walked away and redirected my attention to the floors, painting the walls, and transforming the dresser into a vanity.
Then my mother-in-law paid us a visit and suggested soaking a sponge in hot water, slathering it onto the wallpaper, then scraping. BLESS HER. This method was brilliant. Though I was getting plenty of heat, the steamer wasn't providing enough moisture. The sponge saturated wallpaper peeled off in large sheets. Oh it was the best of times! Glorious wallpaper peeling commenced and sheets fell to the ground. A second wind was discovered. Ah but there were certain spots that just refused to budge. Whoever put this stuff up was going to make damn sure it never came down. I soaked, I scraped, I pleaded with the wallpaper. Jump! Just let go of the wall and jump! Pleeeeeeeese. My baby's nap will be over any second now, please let go of the wall. I broke down and bought the wallpaper remover spray.
Now, what I didn't realize about wallpaper remover is that it's a sweet sweet gift from heaven and worth every penny. (For reference, I bought Chomp Wallpaper Stripper.) Simply spray, wait a minute, then slide your scraper to expose completely clean, paper free walls. Had I bought this stuff earlier, I wouldn't have a nearly full bottle left over or the sadness that walks hand in hand with regret.
Buy the wallpaper remover.
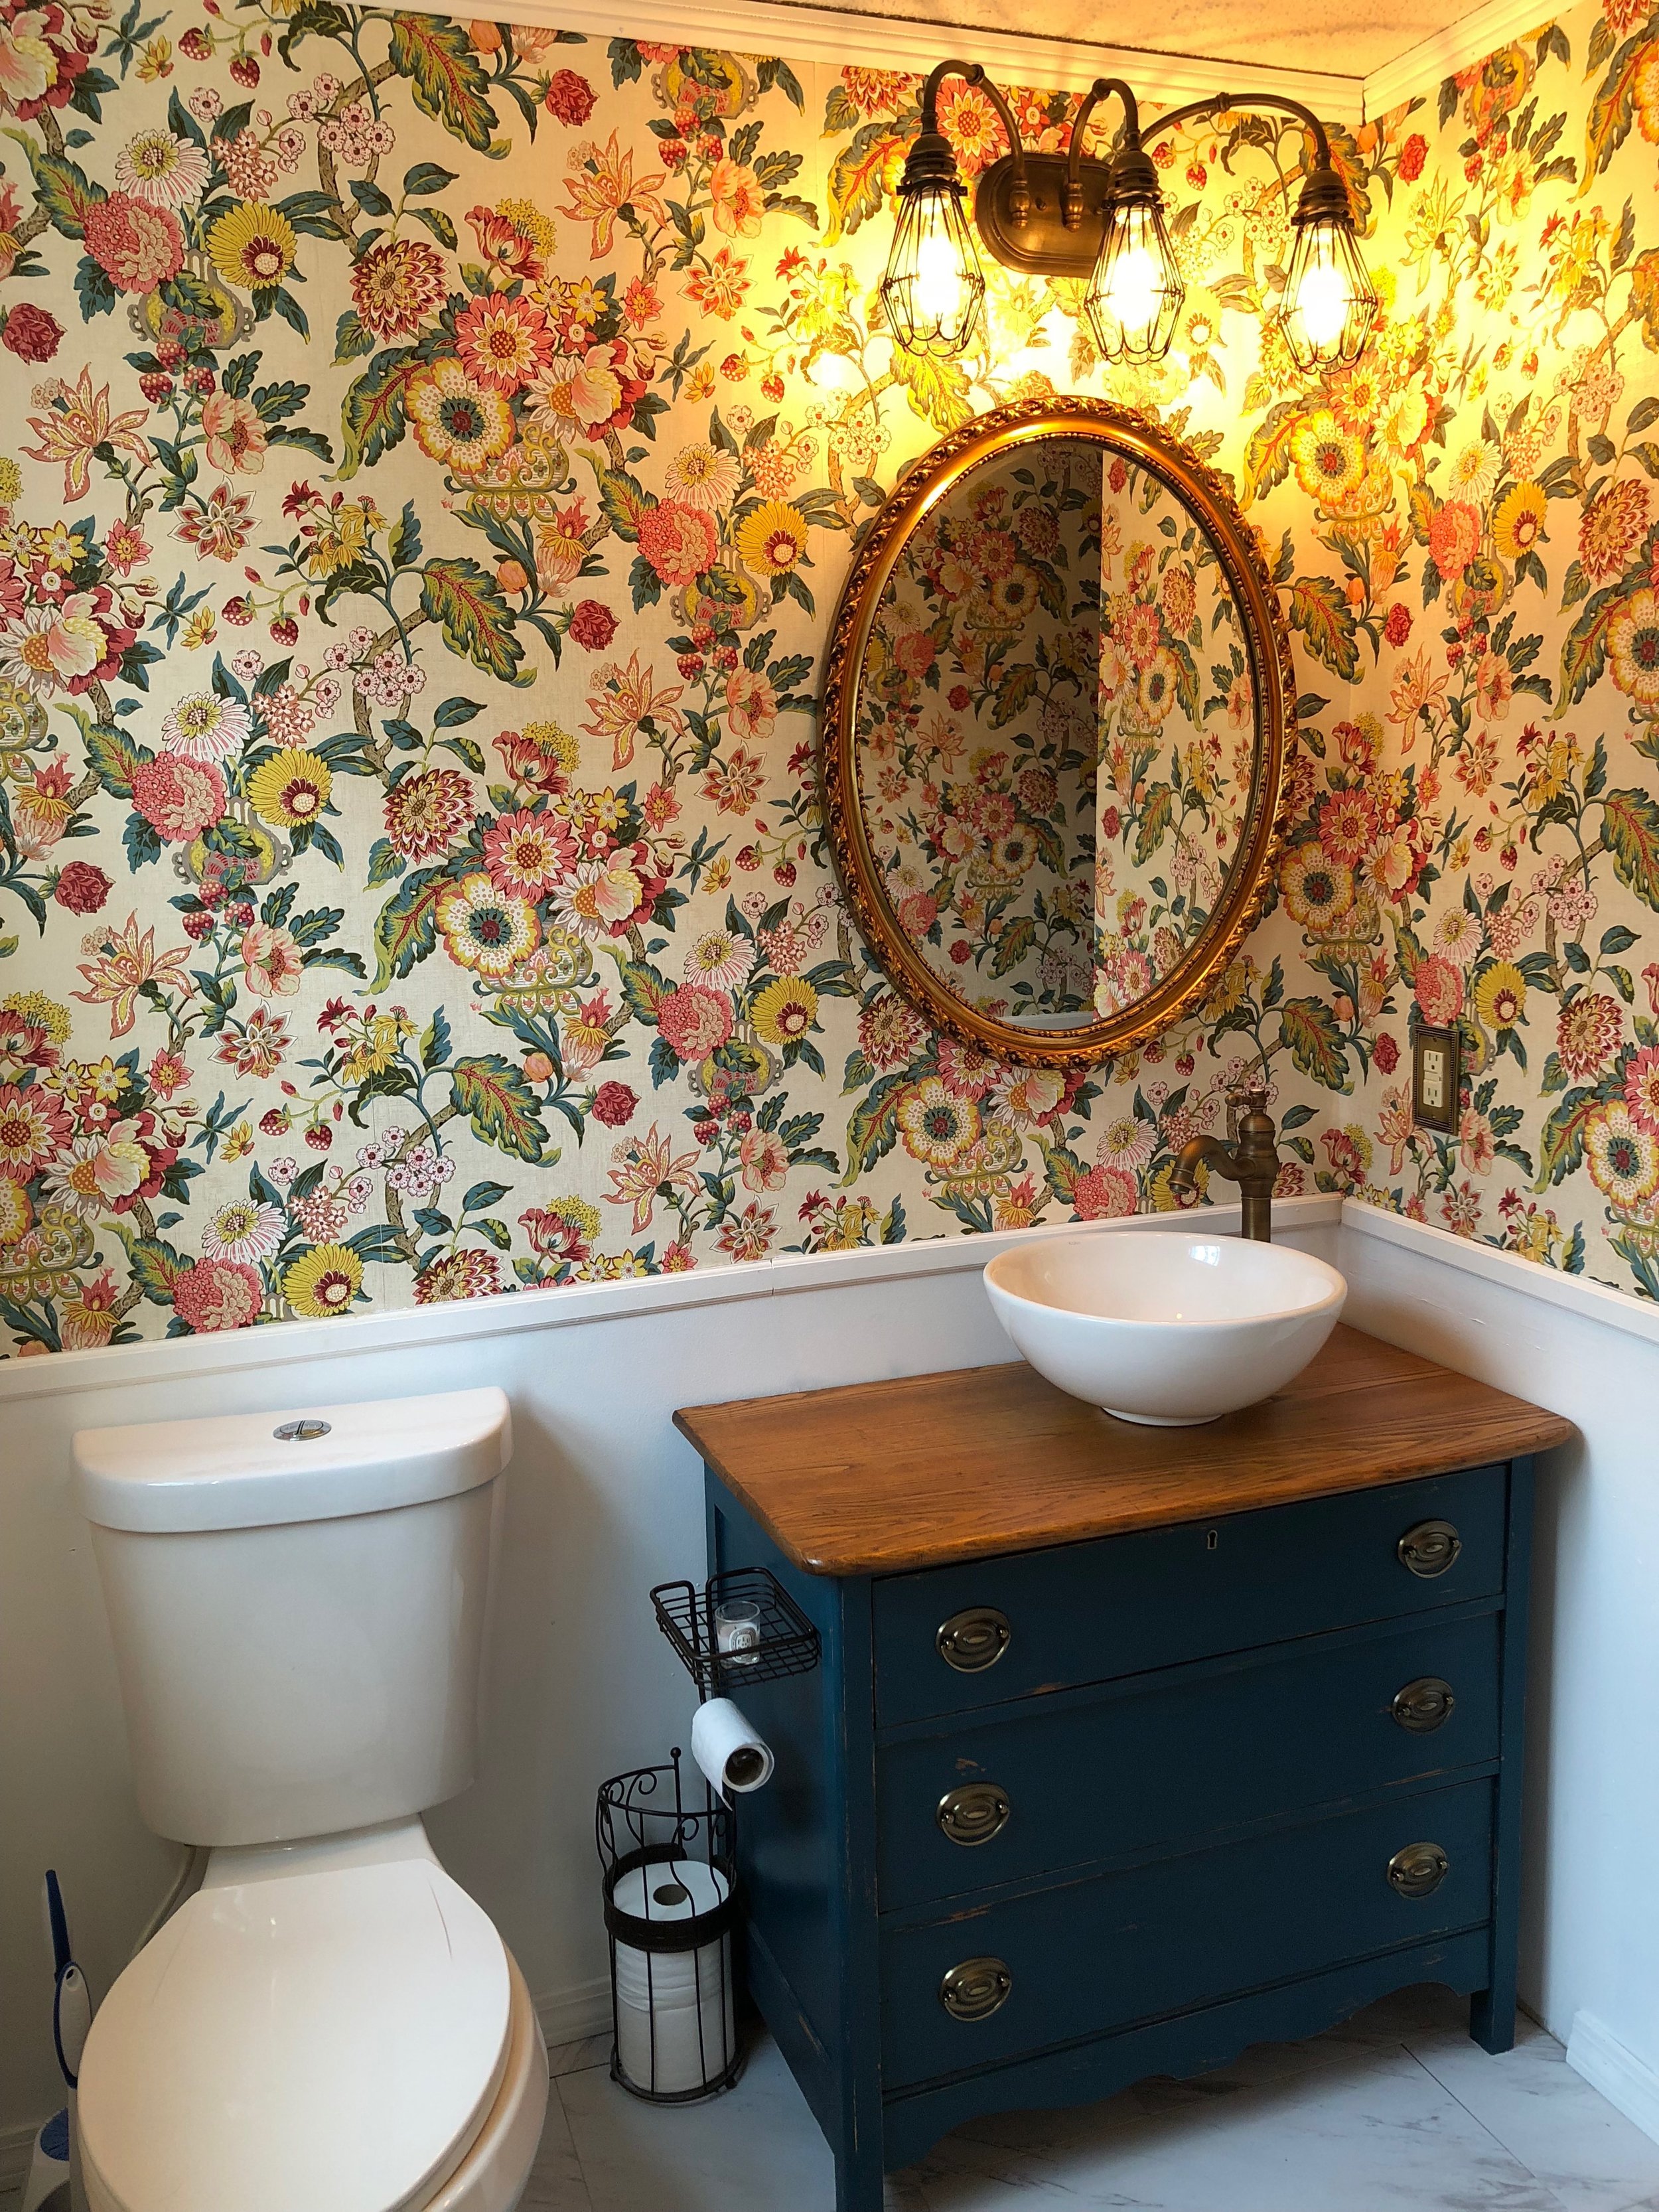
For the new paper, I chose York Wallcoverings in Graceful Garden after falling in love with the spectacularly colorful design. The instructions say to simply "spray with water" then "hang and love." I assure you it was nowhere near that simple and I can also assure you I followed each step to. a. t. I would smooth the wallpaper onto the wall, carefully aligning each seam, stand back with pride, only to watch the sheet slide down the wall before folding over and heaving itself to the floor. Now, the directions say do not, under any circumstances, use wallpaper glue. I used glue. But the results were fantastic!
PART 2: REMOVING THE VANITY
Dear whoever installed the vanity, I do not like you. Random nails secured it to the wall and floor. No rhyme, no reason, and with needlessly long, stripped screws. A hole was poorly cut in the back of the vanity to accommodate plumbing. The plumbing itself was old, shotty, and had been clearly "repaired" more than once. I shut off the water and attempted to separate the pipe from the sink drain. However, it had been stripped over time, so I couldn't get a good grasp on the drop pipe to remove it. I'll spare you the details here, but I removed the plumbing and it wasn't pretty and a hacksaw may have been violently employed. I then unscrewed all the screws I could find, but more lurked within, hidden to the unknowing eye. Yanking and bludgeoning the vanity to near death had seemingly no effect on it's willingness to be set free. Like the wallpaper, it desperately wanted to remain in the bathroom. It was a journey and I'd like to say I'm a more patient person because of it. After numerous curse words, the vanity loosened it's grip and was relocated to its new home outside.
PART 3: PAINTING AND FLOORS
I painted the walls before removing the floors so spills and drips wouldn't bother me, since the floors were on the way out anyway. Two coats later and that depressing purple was a thing of the past.
So far, so good!
Onto the floors. The removal was simple, in that the vinyl floors peeled back easily; they weren't really put down well in the first place. But they were also sitting on another layer of vinyl flooring. Come on.
Sadly, the revealed floors were no more beautiful than their upper counterpart. For the new flooring, I used Traffic Master Self Stick Vinyl in Carrara Marble. My reasoning was this: redoing the kitchen floor is at the top of our to-do list, but not an action item just yet. When we move forward and redo those floors, they'll flow into the bathroom to create more unity throughout the first floor. To this end, it seemed less than sensible to put down high quality flooring only to remove it months later. The peel and stick vinyl was both cheap and visually effective, so I went with it.
With the new floors down, things were starting to take shape.
It's a floor under a floor! SUPERB.
New floors, fresh paint, and a working toilet. Things were really starting to look up.
PART 4: MABLE
Mable, before.
I loved Mable as soon as I saw her. The beautiful swirling grain and not-too-dark, yet not-too-light shade was lovely. Built with integrity, she was made from solid oak and well cared for. I especially liked the curved detail at the bottom. I knew I wanted to showcase that beautiful wood, but felt it almost overpowered the piece and needed to be reduced so you'd appreciate it more. I chose a beautiful saturated shade of teal from Behr called Ocean Abyss. (For the record, I'm typically quite loyal to Benjamin Moore paints, but this color was too good to pass up.) It took two coats to achieve the look I wanted. To give it that distressed look, I used a fine sanding sponge after the paint had completely dried. I prefer the sanding sponge for it's flexibility in my hand and ability to hug curves and edges. For the hardware I chose an antique brass oval with button detailing. The color matched the keyhole and completed that vintage look.
To accommodate the plumbing, I removed the drawers and assessed how far the plumbing would extend into the dresser. Once I had this measurement, I determined it would be difficult to keep the top and middle drawers functional for storage, due to the amount of space the pipes were going to occupy. Though the bottom drawer was also impacted by the piping, it was to a significantly less extent than the others. For the bottom drawer, I was able to get away with only cutting a small notch out of the back panel. For the upper two drawers, I removed the back panel by gently wiggling at the dovetail joint until the backing came free. With the back gone, I could then slide the base of each drawer out by pulling it along it's tracks. Base and back of drawer removed, I was left with a U shape- front of the drawer and the two sides. For the top drawer, I stopped there and reinforced the joints with glue. I was then able to slide this drawer along it's track back into place. Though the drawer is no longer useable for storage, this method allows me to easily remove the drawer whenever I'd like to access the plumbing. For the center drawer, I decided to only keep it's front panel. I secured small latches to the inside of the dresser and the latch counterpart to the back of the drawer. This required another round of careful measuring, so the latches would line up. With the top drawer removed, I was able to reach my arm into the dresser to secure the latches to the center drawer. With the drawer's front panel latched in place, I now had a secure facade, but the ability to remove it down the road, should I want access.
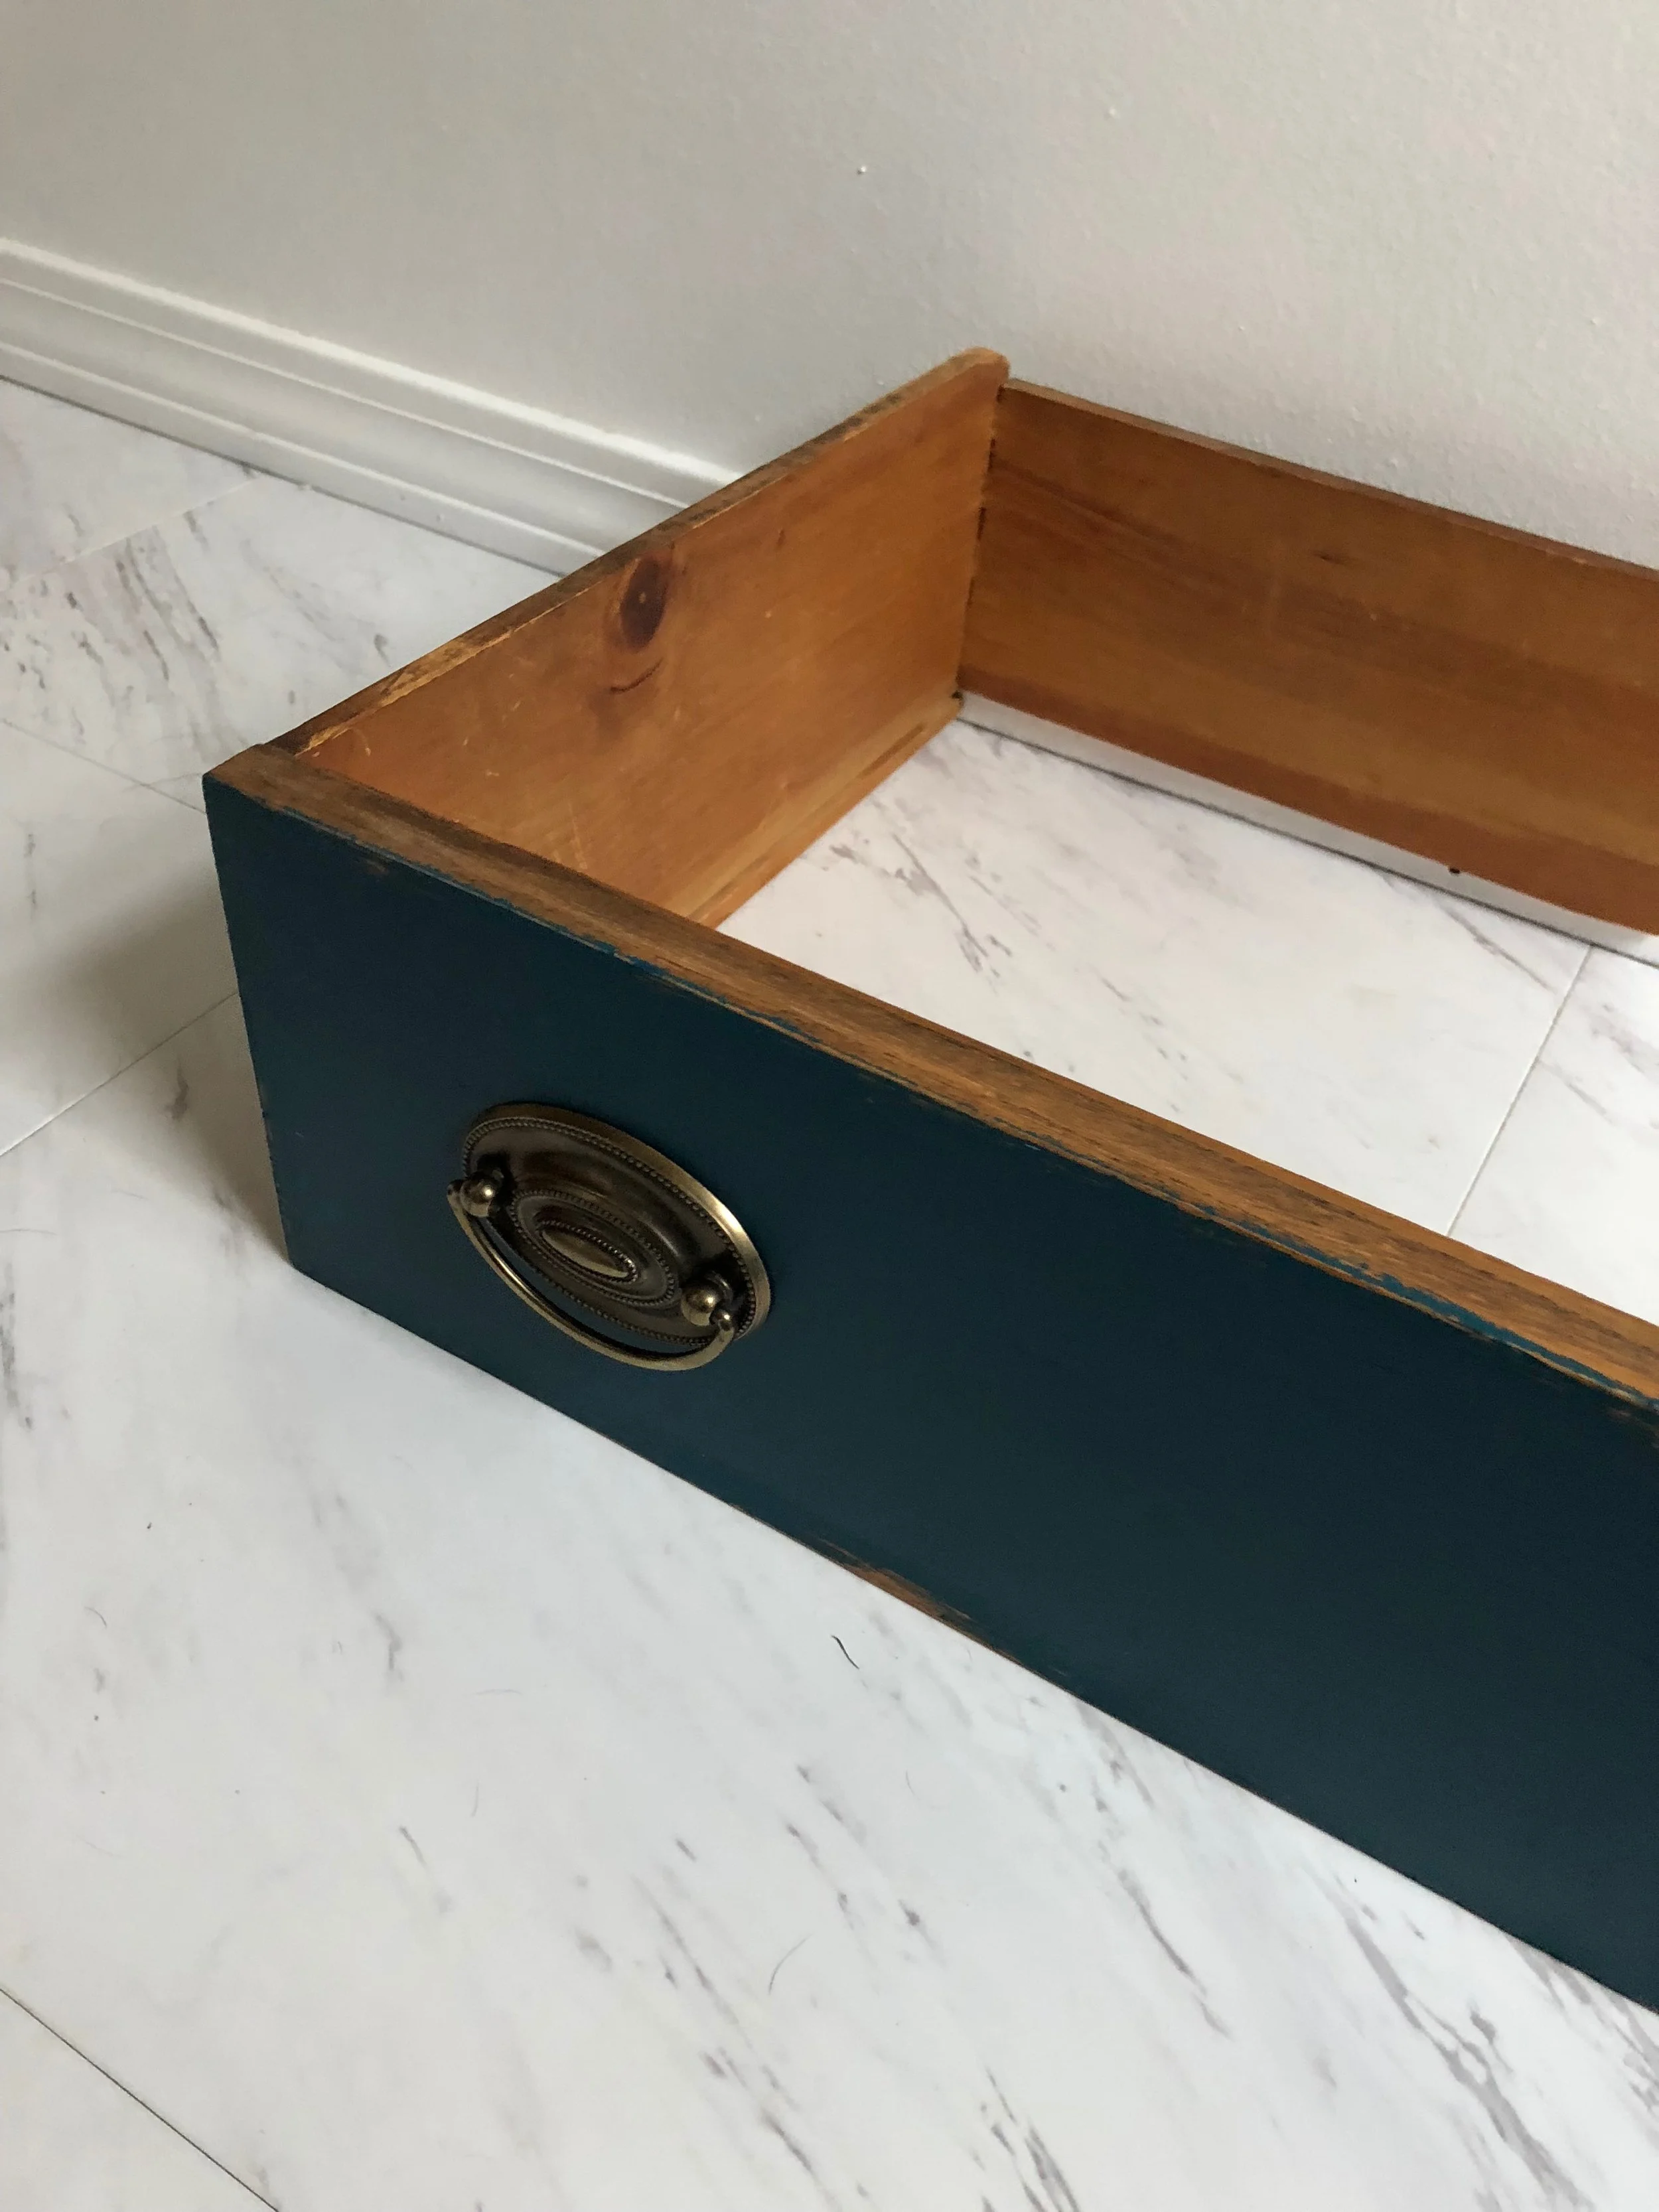
The top drawer after removing the bottom panel. I put the back of the back of the drawer back into place for stability while I let the glue dry around the joints. It was later removed

Gluing the dovetail joints

The drawer still slides easily along its inner tracking, but has no base and therefore doesn't impact the plumbing.

Drawers in place
Using the measurements I'd taken of the plumbing, I determined where the sink's drain hole would need to go to align with the pipes below. This was certainly a measure twice (or 5 times if you're me and have a whole bunch of anxiety) cut once moment. I then attached my hole saw, said one last prayer, and started drilling.
The beauty of this tool is that the pilot bit hits the wood first and stabilizes the circular attachment as you move through the wood. In it's wake, it leaves a perfect hole. The vessel sink was purchased off craigslist at an outrageously discounted price from a builder who had it as excess from a project. It's simplicity, smooth edges, beautiful shape tied the vanity together.
Krauss vessel sink
Plumbing. Note the hole cut into the back of the dresser drops quite low. That's so I can easily slide the dresser in and out of place without having to dip it under the U-shaped pipe. It is also why I cut that small notch out of the back of the bottom drawer.
With the sink's hole in place, I positioned the sink over the hole and determined where the faucet should sit. I had to also consider the length of the connecting hoses to sure they would reach the valves. With measurements and markings in place, I made the hole. To maintain unity with the dresser's style and hardware, I chose the Rosin countertop faucet in antique brass finish. It was both easy to install and looked great without breaking the bank.
And then the moment of truth. I hooked up the plumbing and turned on the water. I watched with bated breath as the water spilled from the faucet... to the sink.. down the drain... and... NOT ONE DROP ESCAPED.
Rosin faucet
To finish the room, I hung a gold mirror and replaced the tired vanity light shades with metal cage covers. We had a toilet paper holder kicking around so in an effort to save money, I used it, despite not being head over heels in love with it. No matter. It serves the purpose of dispensing toilet paper and spared me from spending more money.
So now, drumroll please, here is the final result!
Completed bathroom
Before and after